

How To Draw A Dragon How To Draw A Dragon Flying
Want to larn how to draw a dragon flying?
I'll be showing how to draw a dragon flying, so there's quite a few steps involved, simply don't worry!
Each step comes with step by footstep images that brand an piece of cake dragon cartoon.
Allow'southward become started!
Drawing Supplies Needed
You can use whatsoever drawing supplies to make a dragon sketch, merely here are the best tools for drawing.
Step i:

Start with a large circle and a smaller oval in front of it
Step 2:

Extending from the back of the circumvolve we're going to make the guidelines for our dragon'due south trunk.
The kickoff shape nosotros'll sketch is a directly line and then as if making a Z we'll bring that line in, simply round it out before going outwards.
Make sure the line has a large crash-land towards the dorsum before creating an Southward shape for the tail.
Step 3:

We're going to make the lesser of the torso now.
Starting from the larger circle nosotros're going to make a very stylized "W" shape, coming up at the end with a short but directly line.
Following the example, we're outlining the chest and the hindquarters with this line.
Step four:

Allow'due south end that tail off with a line that starts right below the sharp corner of the hindquarters of the dragon.
Make sure that you're getting smaller equally you go towards the tip of the tail!
At present to the caput we're going to connect the oval to the circle with very athwart lines.
Continue in heed the snout shape and a big cheek.
We're going to be mimicking the same kind of face shape from the offset dragon in this series.
Step v:

Let's make a guideline for the horns.
At the top of the circle make 2 astern curving lines, one shorter than the other!
Pace 6:

Now we're going to add together more than guidelines for afterwards steps.
Right at the back of the circle lets make 3 straight lines with the height one existence the longest.
Then allow's start our leg guidelines with a ">" shape right afterward the widest part of the chest, and a directly / line at the beginning of the widest part of the hind quarters.
Step 7:

Okay, continue focusing on those legs! In front of the > we made at the chest area make a downward directly line, and moving to the hindquarters extend the bending of that little triangle shape before the tail.
Pace 8:

Now we're going to make flat lines forth the bottom side of the legs.
They should end with an upward stroke and be very similar, only the front ane should exist shorter than the back ane.
Step nine:

Now things are going to get a chip complicated.
We need to make the wings so the dragon tin can wing!
Let'south start with the 1 closest to the viewer: make a small (very minor) upwards stroke from the top of the dragon where the front leg is, and extend information technology upwards in a slight curve.
From virtually 1/3 of the way through that curved line we're going to make a 2d line going towards the direction of the head of the dragon.
Step 10:

Okay, now let'southward flesh out that wing closest to the viewer.
From where we ended the line let's extend it towards the tail in an up arc, but brand sure it's slightly angular!
Step eleven:

Bring that line back to the body in a bat fly-similar shape with a small-scale bend at the base inside the torso.
For the back fly, we're going to do the same matter, only thinner!
Now, remember the lines we made on the head?
Connect them similar bat wings as well. Finally, the anxiety!
Curve the feet inward with a little claw sticking out and finish it with a lilliputian round crash-land for the sole.
Step 12:

Time to erase the overlapping lines!
Finish the feet with the back claw and close off your horns!
Pace 13:

Time for details.
On the face make a curved line to dissever the top of the head from the lower jaw and add together some teeth!
Add together a little nostril to the tallest elevation of the snout then our dragon can breathe!
From the inner dip of the snout extend a long shape almost like a lightning bolt with a rounded border towards the back of the caput, under that brand an almond shape.
Now for the wings we won't need to practise much for the back one, but the front one will need to accept some separation betwixt the fly, er, os?
And the leathery part of the wings!
To do this we just brand another line mimicking the superlative guideline of the wing and close it off at the cease.
Like the tail, brand sure it is smaller towards the dorsum.
Add together a niggling hook to the peak of that wing!
Finally, you tin add ridges to your horns or not, it'due south up to you here!
Personalize information technology!
Footstep xiv:

Add any remaining details y'all may desire and you're washed!
Here I added scales on the belly and eye ridge, as well every bit darkened the claws and outlined the wing ligaments!
Thank yous Carolyn for this amazing footstep-by-step process.
You can view her social @ClazDesign if you enjoyed her illustrations.
Check out her shop where she has astonishing illustrations.
Other related topics that'll help you draw animals:
- How to Draw a Dragon (Footstep by Step with Pictures)
- How to Draw a Realistic Tiger | 5 Easy Steps
- Describe a True cat in a Box in Quick and Easy Steps
- How to Draw a Minor Bird – Piece of cake Pace past Stride

Active Fourth dimension 20 minutes
Total Time 20 minutes
Difficulty Easy
Estimated Cost $0
Materials
- Pencil
- Paper
- Or tablet and stylus
Tools
- Pencil
- Newspaper
- Or tablet and stylus
Instructions
- Step one:
Start with a large circle and a smaller oval in front of it.
- Step 2:
Extending from the back of the circumvolve we're going to make the guidelines for our dragon's trunk. The first shape we'll sketch is a directly line and then every bit if making a Z nosotros'll bring that line in, but round it out before going outwards. Make sure the line has a large bump towards the back before creating an S shape for the tail.
- Stride 3:
We're going to make the bottom of the body now. Starting from the larger circle we're going to make a very stylized "West" shape, coming up at the end with a brusque but straight line. Following the example, we're outlining the breast and the hind quarters with this line.
- Stride four:
Let'south end that tail off with a line that starts right beneath the abrupt corner of the hind quarters of the dragon. Make sure that you're getting smaller every bit you get towards the tip of the tail!At present to the head we're going to connect the oval to the circle with very angular lines. Keep in heed the snout shape and a large cheek. We're going to be mimicking the same kind of face shape from the start dragon in this series.

- Footstep 5:
Let's make a guideline for the horns. At the top of the circle make 2 backward curving lines, one shorter than the other!
- Stride six:
Now we're going to add more guidelines for subsequently steps. Right at the back of the circumvolve allow's make 3 straight lines with the top i existence the longest.And then let's start our leg guidelines with a ">" shape correct later the widest part of the chest, and a straight / line at the commencement of the widest part of the hind quarters.

- Step vii:
Okay, go along focusing on those legs! In front of the > nosotros made at the breast surface area make a downward straight line, and moving to the hindquarters extend the angle of that niggling triangle shape earlier the tail.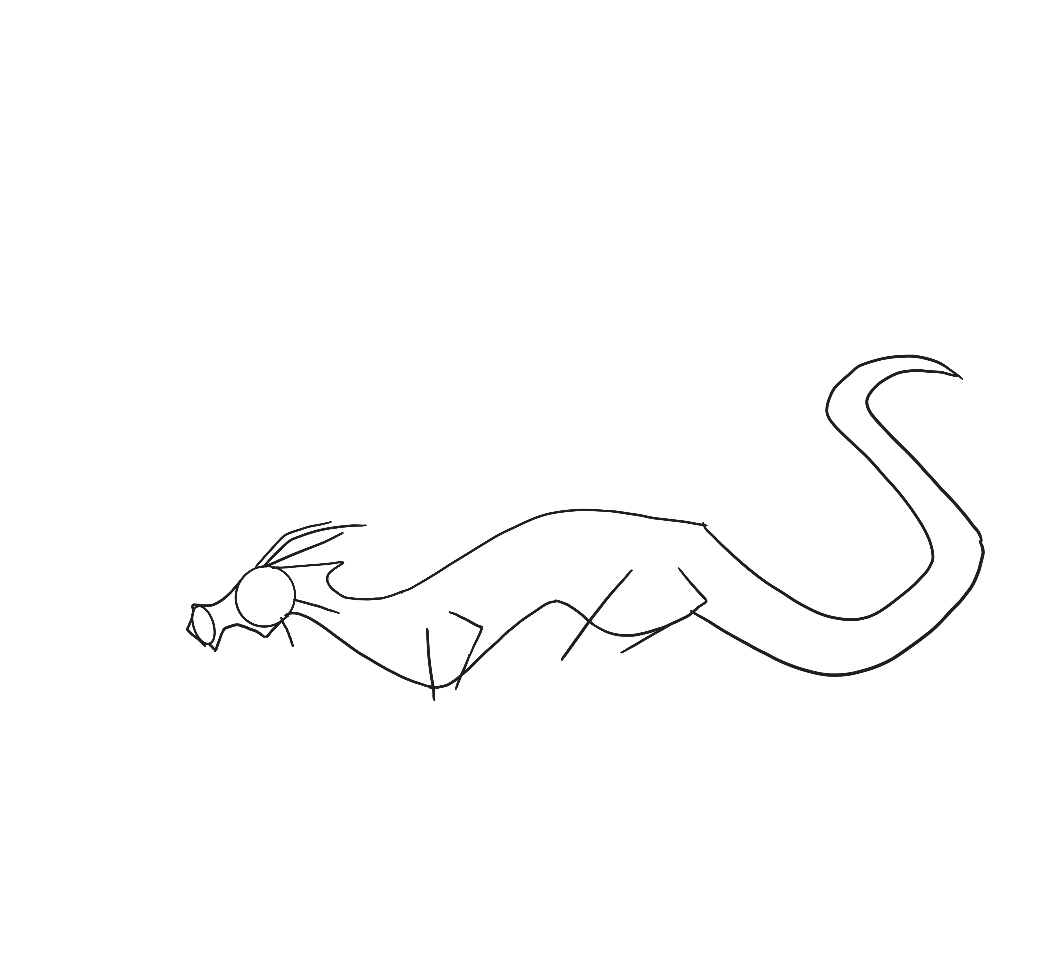
- Stride eight:
Now we're going to make flat lines along the bottom side of the legs. They should end with an upward stroke and be very similar, only the front one should be shorter than the back one.
- Step 9:
Now things are going to get a bit complicated. We need to brand the wings so the dragon can fly!Let'due south start with the 1 closest to the viewer: make a small (very small) upwards stroke from the top of the dragon where the front leg is, and extend it upwards in a slight curve.
From well-nigh one/3 of the way through that curved line we're going to brand a 2d line going towards the direction of the caput of the dragon.

- Stride 10:
Okay, at present let'south flesh out that wing closest to the viewer. From where we ended the line let's extend information technology towards the tail in an upwards arc, but make sure it's slightly athwart!
- Stride xi:
Bring that line back to the body in a bat wing-similar shape with a small curve at the base within the torso. For the dorsum fly, we're going to do the same thing, just thinner!Now, remember the lines we fabricated on the head?
Connect them like bat wings besides. Finally, the feet! Curve the anxiety inward with a petty claw sticking out and end it with a trivial round bump for the sole.

- Stride 12:
Time to erase the overlapping lines! Finish the feet with the dorsum claw and close off your horns!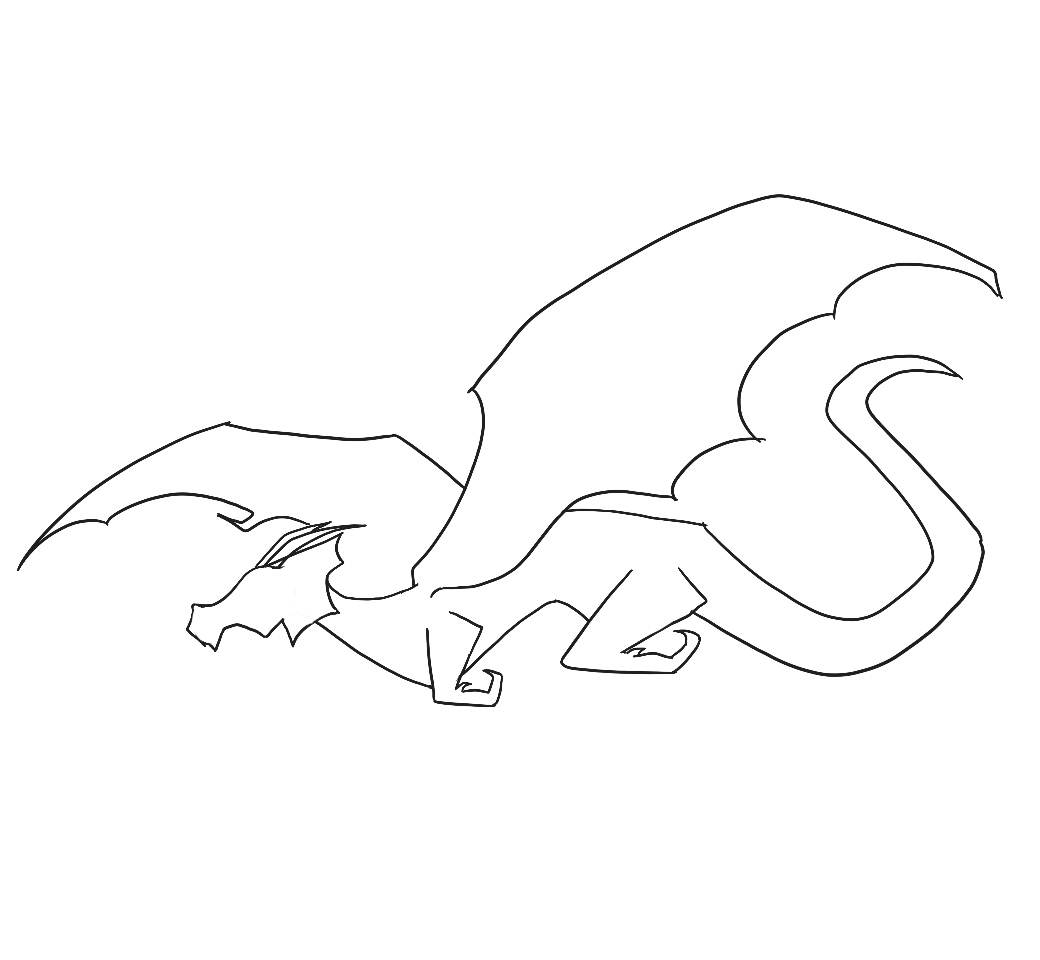
- Pace 13:
Time for details. On the face make a curved line to separate the tiptop of the caput from the lower jaw and add some teeth! Add a petty nostril to the tallest peak of the snout then our dragon can breathe!From the inner dip of the snout extend a long shape most like a lightning bolt with a rounded border towards the dorsum of the caput, under that brand an almond shape.
Now for the wings, nosotros won't need to do much for the dorsum one, but the front end one will need to have some separation between the wing, er, bone? and the leathery role of the wings!
To do this we just make another line mimicking the superlative guideline of the fly and close it off at the finish. Like the tail, make sure it is smaller towards the back. Add a little claw to the peak of that wing!
Finally, you can add ridges to your horns or not, it'due south upwardly to you hither! Personalize it!
- Step 14:
Add together any remaining details you lot may want and you're done! Hither I added scales on the belly and centre ridge, as well as darkened the claws and outlined the wing ligaments!

Source: https://jaejohns.com/how-to-draw-a-dragon-flying/
Posted by: gorbyuped1966.blogspot.com
0 Response to "How To Draw A Dragon How To Draw A Dragon Flying"
Post a Comment