

Flip-Top CNC Table : 11 Steps (with Pictures) - gorbyuped1966
Introduction: Flip-Tip CNC Table

Space is expensive, space saving is not. With this table in my garage, I have a 30 sq ft figure out table and on the under side, a 33" X 33" Shapoko XXL CNC machine when I need it.
The CNC machine is screwed to the underside of the table crown, which is involved to two side shelves with shafts and bearings. Four ordered screws keep the shelve rigid when it's in either position.
Step 1: Live Q+A on Godhead Project Lab
Donald Bell recently hosted me happening his Maker Throw Lab youtube channel. We talked approximately the design, fabrication options, and approximately ideas on how to improve it for the next ring.
Gradation 2: Tools + Materials
At Pier 9, we've got totally the awesome tools. I ready-made this fancy using our Shopbot CNC.But don't worry, you don't need those fancy tools to make this project.
4'X8' CNC Auto
I used the Shopbot at Wharfage 9 to perforate these pieces because it's big enough to fit a 4X8 sheet of plywood and it saves clock. I know, you near certainly don't have accession to one, which is path I ready-made the following instructable some years ago...

Digital Fabrication by Hand
If you don't have a CNC router, all you need is a hand Mandrillus leucophaeus, a jigsaw with a argentiferous cutting blade, a large data format mark from a print shop, and many patience. Here's a link up to my Appendage Prevarication by Hand instructable, display you how to be your own CNC motorcar: https://www.instructables.com/id/Appendage-Fabrication-By-Hand/
I'll provide PDF drawings in the next step that you can use as templates to cut out your own parts by hired hand with a jigsaw.
3D Printing process
I usance a Prusa I3Mk3S for well-nigh everything. It's the best knock for your buck, in my opinion- precise well made, 3D printable replacement parts, straight and reliable.
Hardware
All of the pursuing hardware can constitute substituted for smilier hardware available in your position and happening your budget, just the CNC files are designed with these parts.
- Two rim decorated Ball bearings ($40 Ea. from John Bach McMaster-Carr). These are for the motion motion.
- Two quick-disconnect bushings ($13 Ea. from McMaster-Carr). These connect the shafts to the side shelves.
- 1 1/2" Ø steel tube ($23 for 3' of tubing from McMaster-Carr, cut two 3" sections to length). These serve as a dirt cheap alternative to dear shafts for the rotational motion.
- *This assembly is expensive (I had these parts lying around), you could probably make this work with some steel metro and a couple of chouse collars.
- 1" wood screws ($7 for 100 pack from McMaster-Carr). These hole entirely the panels together.
- 1/4-20 X 2" hex bolts, plus nuts and washers. These fix the assembled shelf ends, bottom tray, and serve as thumbs screws when combined with 3D printed parts.
- Eight 1/4-20 threaded inserts ($12 for a 25-pack on McMaster-Carr). These wind into holes on the revolving table top to keep out it secure with riffle screws.
- Quaternary M-8 X 20mm hex bolts plus washers. These replace the adjustable feet on the bottom of the Shapeoko.
- Four 4" high plate casters. The assembled table weighs about 300 LBs, the Shapeoko weighs 115 LBs, and you should component in another 100 LBs to get on the safe side considering entrepot and weight of worldly to be cut operating theatre fixed. The casters you choose to use should be able to support 515 LBs. These casters on McMaster-Carr can acquit that load (1400 LBs goop).
Shapeoko XXL past Carbide 3D
- This is a majuscule CNC machine for furniture-sized projects. Information technology's got a 33"(X) x 33"(Y) x 3"(Z) cutting area and it's fully compatible with Fusion's Cam creature. The post processing in Fusion seems to puzzle out alright with every the tests I've tried. Now that I've got a decorous table, I'll be using it much Sir Thomas More oftentimes.

Materials
- 2" thick scrap wood. This will be cut into blocks about 4" X 4" or bigger arsenic a agency of attaching the CNC simple machine to the underside of the table.
- Sixer 48" X 96", 1/2" thick (12mm) plywood sheets. All of the of import pieces of the table are cut from this material.
- Two 24" X 26", 1/4" thick (6mm) plywood sheets. This material is exploited for spacers between the rotating prorogue and the root shelves.
Package
Fusion 360 is free and information technology's awesome. I use it for everything I intention and fabricate. If you accept access to a CNC machine, it's around as good as IT gets when it comes to easy and fast CNC programming.
Student / Educator License (renew free all 3 years)
Hobbyist / Startup (renew clear every year)
Step 3: Design + Files
The Fusion 360 archive (.f3d extension) is a working file that includes parameters (like plywood thickness) and joints that will lease you preview the movement of the rotating remit top. You can upload and delete this file to your own specifications.
The PDF files are sheet layouts that you can print at any print shop that can handle elephantine format prints (which likely includes whatever shop that does architectural or construction document printing) and role as templates to cut the parts dead exploitation the Digital Fictionalization away Hand instructable mentioned in the previous measure. These sheets should glucinium printed at 100% scale, which will be 48" X 96" sheets.
The STL file is a ready-to-print 3D file in that will interface with the 1/4-20 screws described in the previous step.
Step 4: Clipping Panels

I used the 4X8 Shopbot I'm lucky enough to have access to at our patronise in Pier 9. The panels are bigger than the carving area of the Shapeoko CNC (obviously) so I wasn't able to use it for this project.
There are total of six 48X96in X .5in panels that produce up the shelf, and two 24X36in X .25in panels for the spacers on the sides. I laser cut the quarter column inch panels.
Step 5: 3D Printing

The thumb screws are made from 1/4-20 hex bolts and 3D printed handles to save money. I exploited the EasyThreeD printer I mentioned in the presentation and the parts came out fine. Not the best quality printer I've ever secondhand, but totally acceptable for simple prints the like this. I think this would Be a great printer for a beginner- the port and controls are dead-simple, it's very quiet, and fits on a desktop. For reference, you could impress something about the size of a coffee mug on this machine.
Step 6: Assembly Method

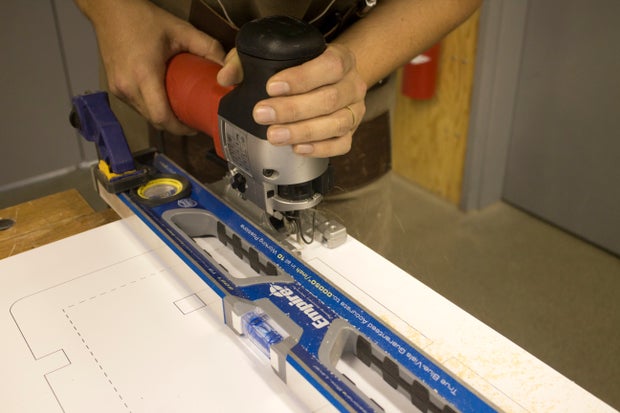
The assembly method is something I've used in front on projects same this. The panels have a kind of large finger joint profile, and the face of each finger cooperative has a 1/8" pilot hole trained in it. I hold the parts jointly and use a handheld drill to trill a pilot hole into the panel that's perpendicular style to the cakehole. That way I know the hole is straight (having used the pilot hole made aside the CNC), and I can prevent the plyboard from splitting referable the force per unit area made by the drive in.
With the aviate pickle drilled, I use countersunk square drive screws because they sit flush with the panels and are very hard to strip (and they look ice chest than philips head screws).
Step 7: Assemble Side Shelves
The prototypic parts to assemble are the side shelves. They're pretty straightforward if you follow them method I described in the previous ill-trea.
You can also add the bushings unsmooth up with the holes in the vainglorious panels in this step. The bushings give way on the at heart of the shelf. There is no room 'tween the panels for the bushing to go on the outdoorsy.
NOTE: Make predestined that the panels with the shelf stick holes in them find! They're not bilaterally symmetric on the horizontal axis, so it's available to change by reversal them and find yourself drilling holes to make the shelves horizontal surface (I English hawthorn operating theater may not have done this).
Pace 8: Assemble Board Upmost and Buns Tray
It's the same floor with the tray and the shelve top. You can also add the 1/4" spacer panels and the ball bearings in this step.
NOTE: Make sure that the bearings are installed on the inside grimace of the table tray. There is no board on the gap between the table top and the side shelves for this particular bearing.
Step 9: Bond Sidelong Shelves, Hold over Top, and Bottom Tray
When all the modules are cooked, it's time to bolt everything together.
First, I fast the bottom tray to the side shelves with the whole thing soured on its lateral. Past I turned the table connected its side and placed the table crown so that the bushings lined up with the bearings, then abroach in the shafts with a hammer. In that respect are set screws connected the bearings and bushings that will keep the gap from broadening when the table is swiveled.
Next I added the threaded inserts to the table top sides and exploited the thumb screws to certified the table go past.
With that done, I attached the casters to the bottom so that they were centred half way between the side shelves and the center tray.
Step 10: Attach CNC Machine
With the flip table in the CNC positioning, I located the CNC automobile on it and removed the changeable feet. I got about 2" thick scrap Sir Henry Joseph Wood blocks and attached them to the corners of the machine with hex bolts and washers (M8 size of it bolts) and used roughly scrap aluminum angles to attach them to the table top.
In hindsight the brackets were believably unnecessary, I could have only screwed them into the hold over top from the underside.
Step 11: Finished Cartesian product / Lessons Learned

Overall I'm precise felicitous with the shelve, simply bestowed the weight and the shrimpy amount of fleece material stabilizing it in the long dimension, it wobbled more than I was comfortable with. I made some lilliputian promptly-release chalks for the overhanging edges of the shelves that keep it very steady.
A good way to body-build it might be to bear viii casters- four where you see them in the pictures, and another quaternity at the outside corners. Also, there's no distributor point in victimization any fixed casters at all- swivel casters all around would do (I just used what I had fabrication around in the shop.
The next change is going to be incorporating a shop vac system and a hood for the router to ascendence dust when cutting.
Planning on building your own? Expect my anything in the comments and please share your results.
Personify the First to Share
Recommendations
Source: https://www.instructables.com/Flip-Top-CNC-Table/
Posted by: gorbyuped1966.blogspot.com
0 Response to "Flip-Top CNC Table : 11 Steps (with Pictures) - gorbyuped1966"
Post a Comment